Combining Fast and Slow Stochastic Oscillators with EMA
This lesson will cover the following:
- Slow and Fast Stochastic Oscillators
- EMAs
- Combining them into a viable trading strategy
In the current article we will present to you a yet another combination of a Stochastic oscillator and an Exponential Moving Average, but this time we will be using simultaneously a slow and a fast stochastic. Moreover, we will be confirming our entry points via reversal bar patterns.
The logic behind this strategy is to look for points where the price is rebounding from the Exponential Moving Average, confirmed by a reversal bar pattern, while the slow and the fast stochastic are in the opposite overbought-oversold areas. Lets get to the specifics.
For the Slow Stochastic Oscillator we will be using the following settings: %K 21, %D 4 and Slowing 10. For the Fast Stochastic Oscillator we will use %K periods 5 and %D periods 2. Both will be running overbought and oversold areas of above 80 and below 20. The Exponential Moving Average will track back 20 periods.
Trend required
 As with each trading system based on moving averages, this one as well should be used in trending markets. Thus, for an entry signal to be generated there are two conditions – a strong trend must be in motion and the two stochastics must be in the opposite extreme areas (overbought and oversold). When those requirements are met, you can look for an entry signal when the price bounces off the 20-period EMA and continues in the with-trend direction. It would be best to first wait for confirmation by a reversal bar pattern and enter after its completion.
Your stop-loss order must be placed at around 10-15 pips above the high of the reversal patterns high in a bear trend, or beneath its low in a bull trend. Meanwhile, profit target should be around the previous swing extreme (swing low in a bear trend or swing high in a bull trend). Typical reversal patterns which may be used as an entry confirmation are bearish and bullish engulfing patterns, evening and morning stars and others. If you want to read more about single, double a triple bar patterns, read our articles “Patterns Including One Candlestick. Doji Candlesticks“, “Patterns Including Two Candlesticks” and “Patterns Including Three Candlesticks“.
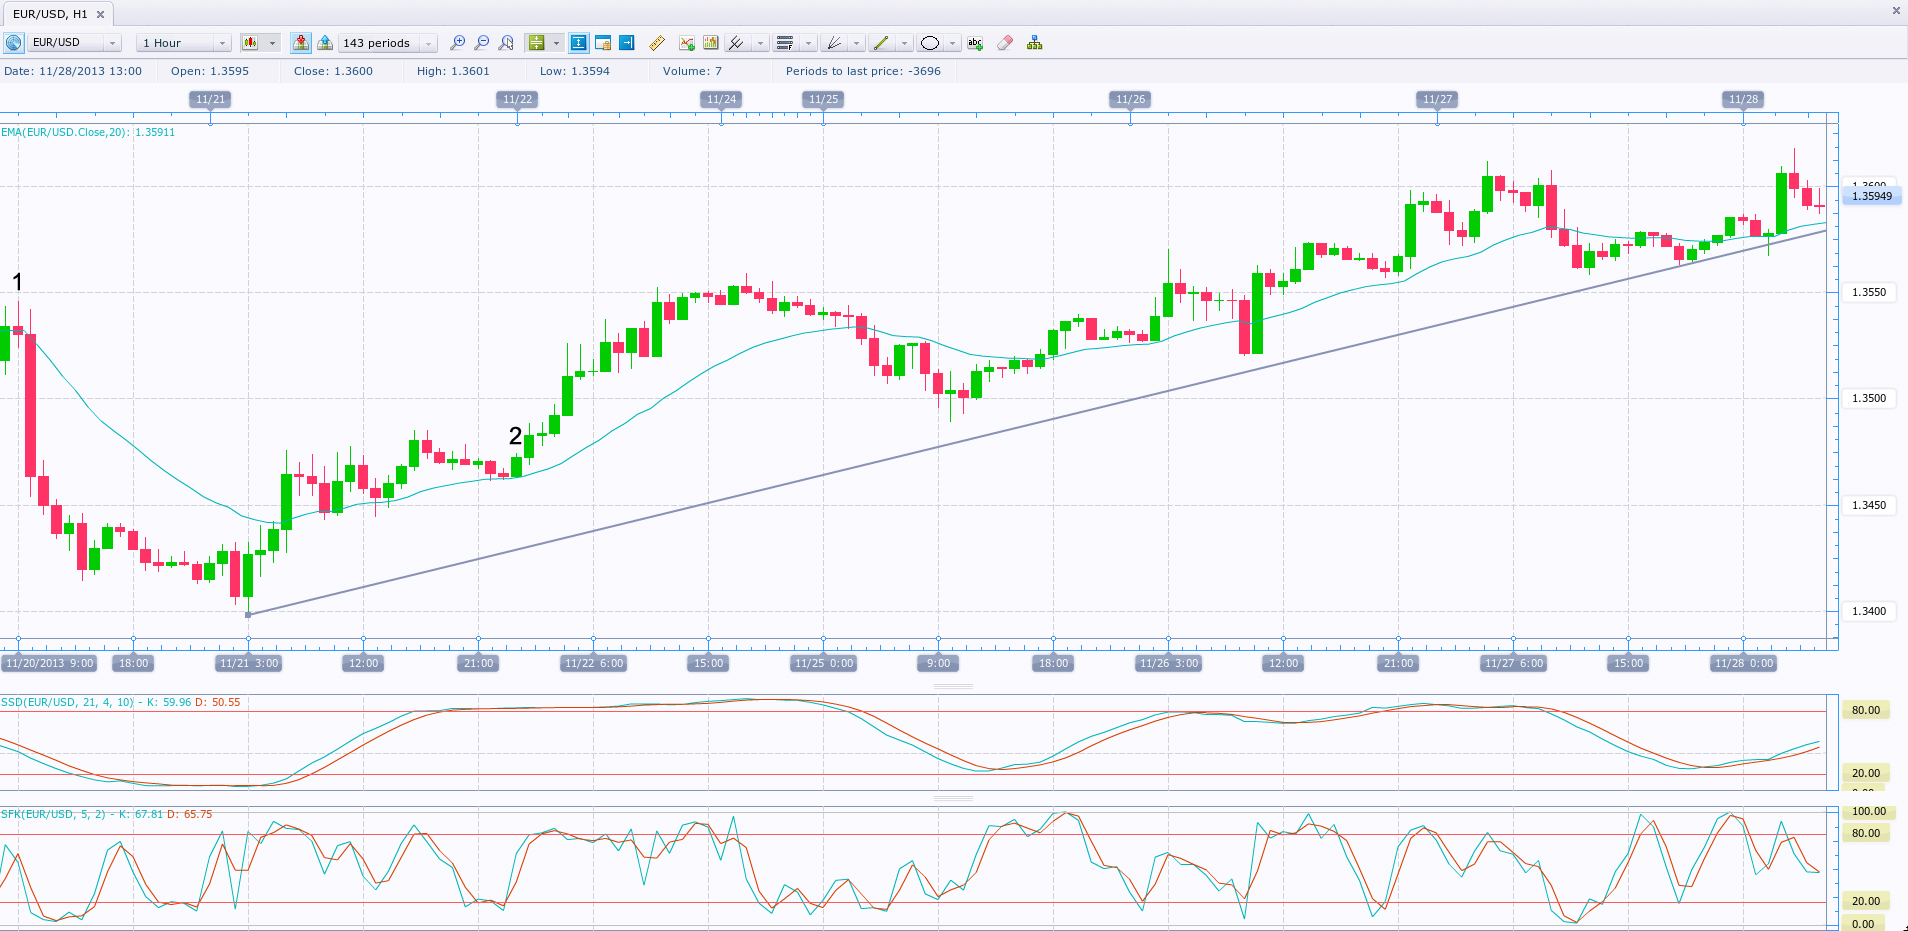
On the screenshot above you can see that a very strong and prolonged bull trend was in motion, thus our strategys first requirement was met. The slow stochastic was initially in the overbought area for well over 30 bars, which gave us a couple of good long-entry opportunities.
First, there was a rebound from the 20-period EMA at bar (2), which ended a bullish reversal pattern (bar 2 was a strong bull trend bar, which was also bottom-shaved, signifying bullish momentum). The slow stochastic has been firmly in the overbought area for some time, while the fast stochastic has just entered the oversold area, giving a green light for a long entry.
We enter above bar 2s high, which was at 1.3475. Our stop loss is placed 10-15 pips below the reversal patterns low, thus at 1.3450. Our capital exposure is 25 pips. Our profit target, the previous swing high, should be the high of bar (1) at 1.3546, thus 71 pips away from the entry level. This makes for a risk-reward ratio of nearly 1:3 and was reached at bar (3). A more conservative management strategy would have been to scale out half of our position upon achieving a profit double the amount risked and trailing our stop to breakeven, which would secure a considerable profit and ensure the remainder of the trade will not become a loser.
Another possible long entry signal was generated at bar (4). It was a bull trend bar which broke out of a tight trading range and reversed the previous bearish bars, rebounding from the EMA. Although it was not a perfect entry because the slow stochastic was little below the overbought area, the rebound from the EMA was still decisive enough. We enter above bar 4s high with a 15-pip-wide stop beneath its low. A considerable two-bar reversal followed several bars later but it did not manage to gun our stop since its low was only 6 pips beneath bar 4s low.
The previous swing high was almost immediately exceeded, thus we can switch our profit target to double the amount risked. At that point we can choose to either exit our whole position or scale it out and trail our stop to breakeven for the remainder.