Combining SMAs and EMAs
This lesson will cover the following
- Simple Moving Averages
- Exponential Moving Averages
- Combining them in a viable strategy
The following strategy uses two combinations of moving averages. A set of Exponential Moving Averages with long trackback periods assist us in determining the trends direction, while a couple of Simple Moving Averages with short lookback periods are used to produce entry signals. Here are the specifics.
This strategy is best used on a 4-hour time frame but you an hourly will also do, if you can digest the whipsaws. A 144-period EMA and a 169-period EMA help you determine the trends direction (if the 144 EMA is below the 169 EMA, the trend is bearish and vice versa).
The Simple Moving Averages are used to generate with-trend and counter-trend entry signals, although we have advised multiple times that novice traders should avoid entering against the market at all costs. A 5-period SMA produces buy or sell signals in the direction of the trend, as evidenced by the two EMAs, while a 14-period SMA is used to generate signals against the trend.
In case some misunderstandings have arisen, lets clarify. If the 144-period EMA is above the 169-period EMA, we have an uptrend. During this uptrend, if a bar closes above the 5-period SMA, it generates a buy signal, while if a bar closes below the 14-period SMA, it produces a sell signal.
Conversely, if the 144-period EMA is below the 169 EMA, we have a downtrend. During the downtrend, if a bar closes below the 5-period SMA, it generates a with-trend short entry signal. Meanwhile, if a bar closes above the 14-period SMA, it generates a counter-trend long entry signal. However, keep in mind that counter-trend betting is strongly inadvisable for novice traders. To read more about trend trading, you can visit several of our articles dedicated to trends, including “The Trend – a Traders Best Friend“, “Basics of Trends and Trend Lines“, “What Defines a Strong Trend“, “Trend Trading Guidelines“.
Profit target, stop-loss
 As for profit target and protection, you can either use a trailing stop with properties according to your own preferences, or you can set a static stop-loss level at the low or the high of the signal bar (the bar prior to the entry bar). When determining your profit target you should aim for a risk-to-reward ratio of at least 1:2.
For example, you can target a profit double the amount risked while using a fixed stop-loss (the high or low of the signal bar). Upon achieving the 1:2 risk-reward ratio, you can close a portion of your position, thus locking in partial profit, and keep the other portion in the market to further milk the trend, while protecting it with a trailing stop. In case you are not using a trailing stop at all, another exit point can be a close on the opposite side of the 5-period EMA.
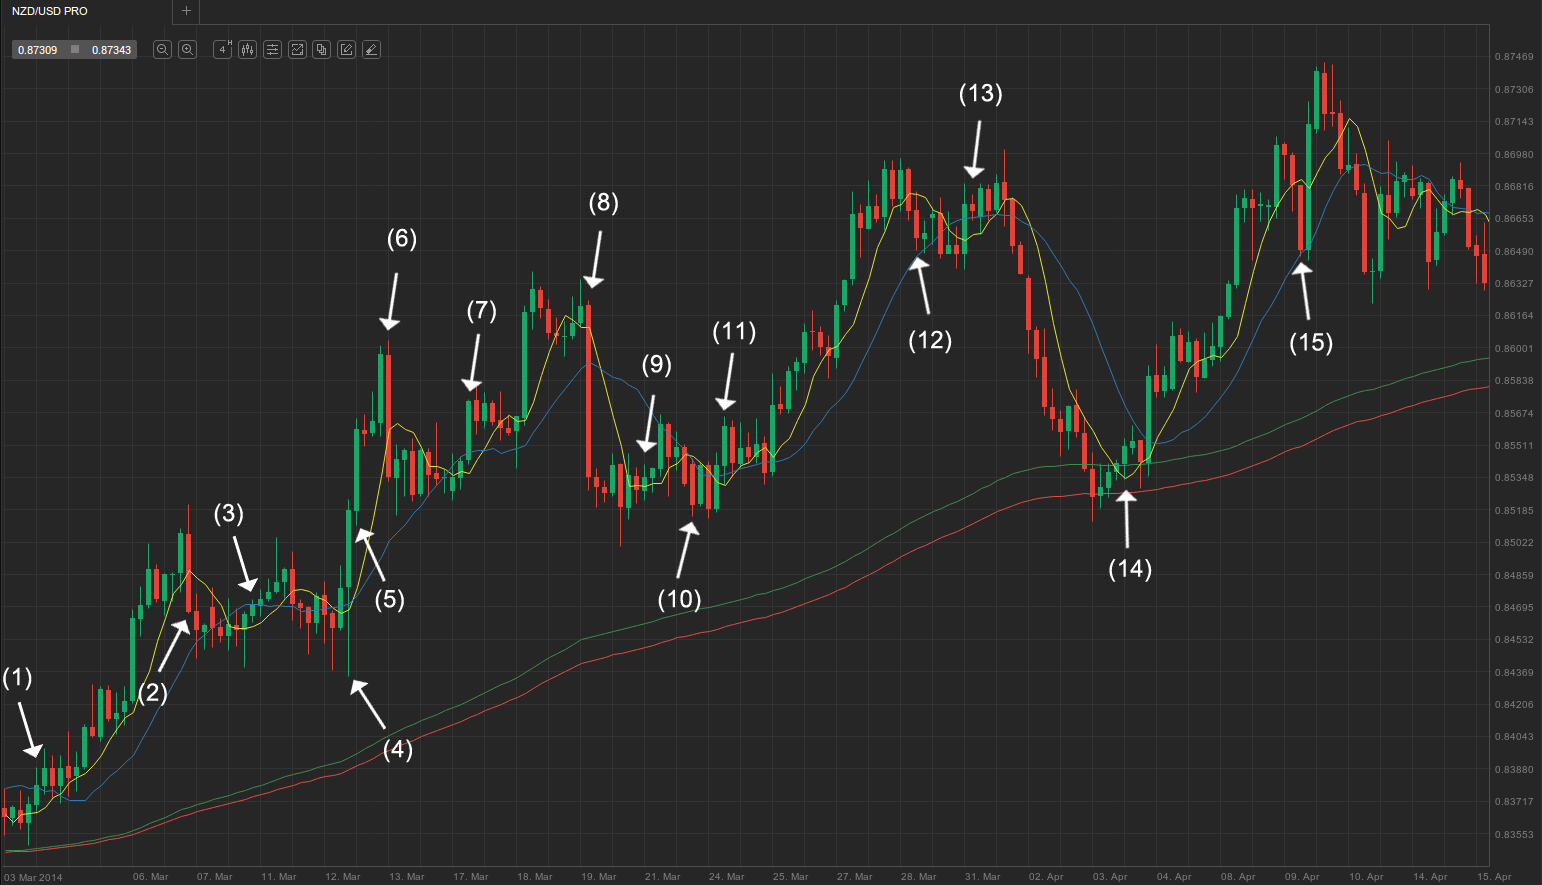
On the example above we have focused only on with-trend entries. The green line is the 144-period EMA and colored in red is the 169-period EMA. The 5-period SMA is in yellow, while the blue line is the 14-period SMA.
We enter long at (1), with a stop-loss at the previous bars low. We can exit either after achieving a profit double or triple the amount risked, or, if we were using a trailing stop, we would have been stopped out at the big bear trend bar (2).
We enter our next trade at (3), but it failed to reach our profit target, gunning our stop-loss was at bar (4). However, bar (4) acted as a signal bar for our next entry at bar (5), which would have been a minor winner after the bar (6) trail stop pushed us out of the market. Bar (7) would be our next entry point with a stop-loss below the previous bars low, and the exit would be at bar (8) when the trailing stop would kick in.
The next long position at bar (9) would be a minor loser as the bear trend bar (10) would hit our stop. We re-enter at bar (11) and exit on the trailing stop at bar (12). The trade entered at bar (13) would also be a loss as the following market sell-off would hit our stop, but the trade entered at bar (14) and exited at bar (15) would completely offset all of our sessions losses. Upon recapping the entire trading session you will undoubtedly be drawn by the notably positive balance of earned pips.