Combining Stochastic Oscillator and Two EMAs
This lesson will cover the following
- Full Stochastic Oscillator
- Exponential Moving Averages
- Combination between the two
In this article you will be acquainted with another fairly simple and yet effective trading strategy which combines Exponential Moving Average crossovers with the stochastic oscillator.
It is used on daily time frame, but lower ones, such as the hourly, should also work fine despite the whipsaws. It involves the use of a 2-period EMA, a 4-period EMA and the stochastic oscillator. The logic behind this strategy is to buy or sell the EMA crossover, while the stochastic filters out false signals.
The entry and exit signals are quite straightforward. Go long when the 2-period EMA crosses the 4-period EMA from below and continues higher, with the stochastic being below 50. Conversely, short signals are provided when the 2-period EMA crosses the 4 EMA from above and continues lower, while the stochastic is above 50.
You should exit the position when the EMAs cross each other back, or when the stochastic enters the overbought or oversold areas (70-80 and 30-20 respectively). As for the stop loss, you can use a trailing stop with an absolute or percentage value according to your own preference, or you can set an exact stop-loss level. This should be the low of the entry day for a long position, or the respective high for a short position. In any way, a risk-to-reward ratio of at least 1:2 is advisable to be aimed at.
Example
Check out the following example.
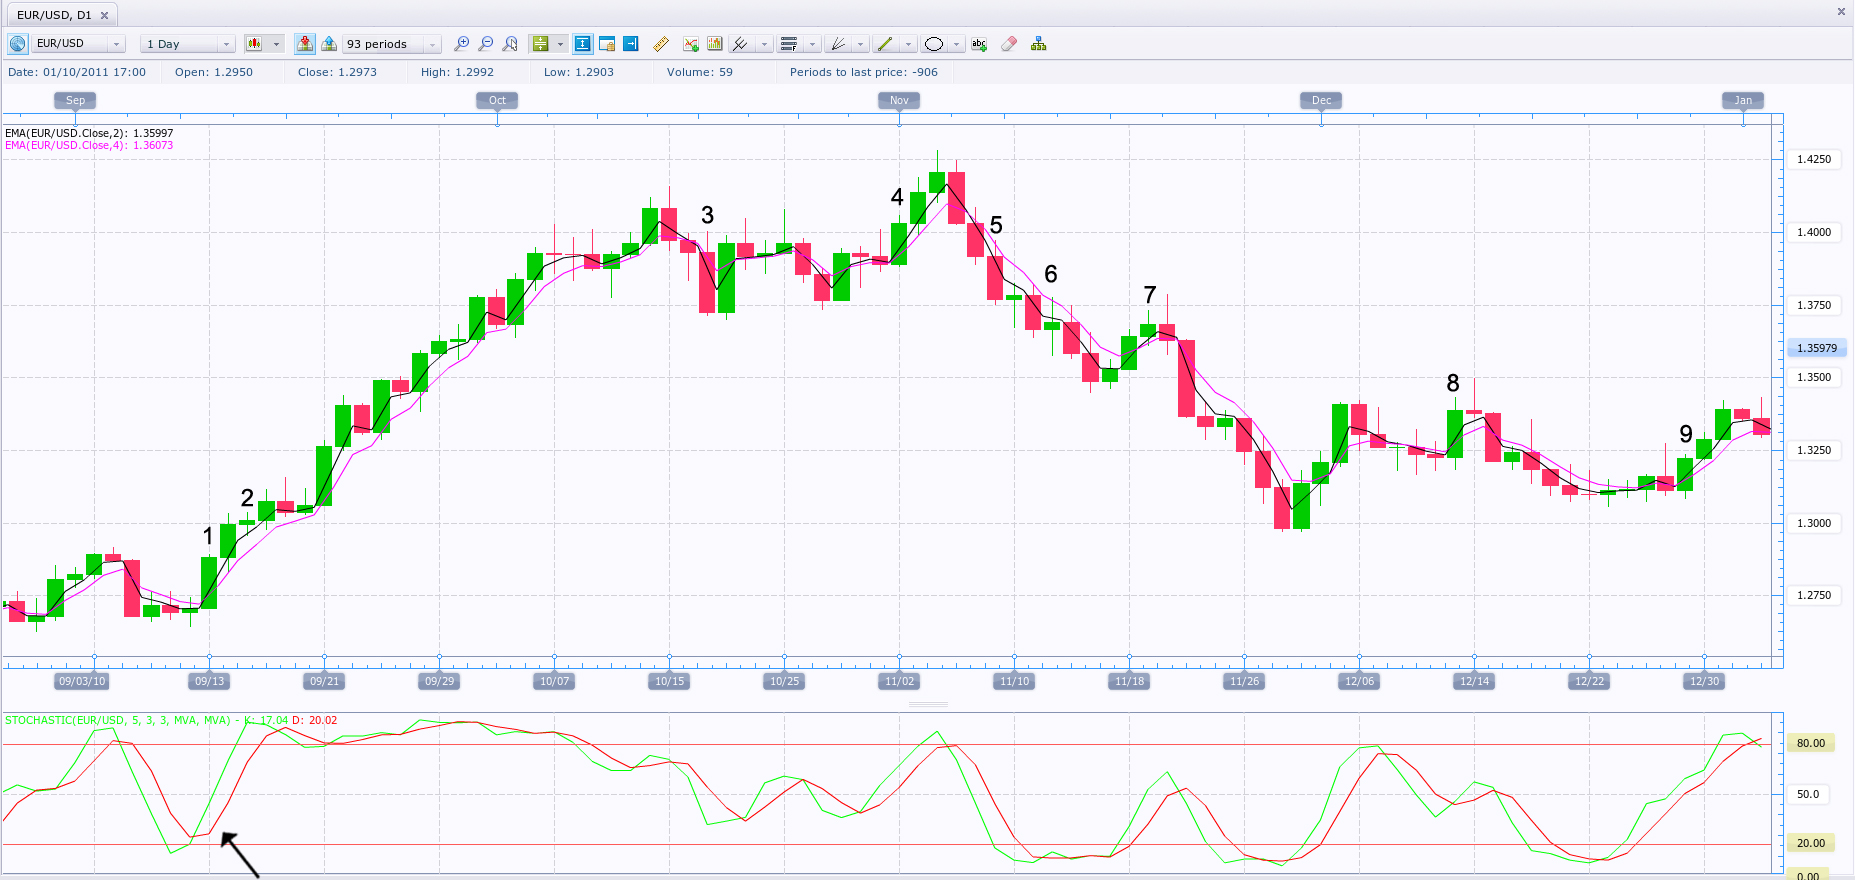
You are looking at the daily EUR/USD chart. The general trend is bullish and so we will refrain our entries only to long, with-trend, positions. Our first signal is generated at bar 1 when the 2-period EMA (black line) crossed above the 4-period EMA (purple line) and the stochastic was below 50, but was edging higher. We enter on the next bar, at the high of bar (1), thus at 1.2892 US dollars and set our stop-loss several pips below bar 1s low. Because it is at 1.2703, which is close to the double zero level, we need to place our stop further down so it doesnt get gunned by institutional traders. In this article you can read why. Thus, we decide yo place our stop at 1.2675. Although the stop seems to be quite wide, you can see from the following move that it was well worth it.
As the price advances, we have several choices. We can either exit the entire trade as soon as the stochastic hits overbought, which however does not always mean that the price is about to reverse. Alternatively, we can scale out part of our position as the overbought area is entered and keep the other portion on the market. Third, we can aim for the achievement of a 1:2 – 1:3 risk-reward ratio, unless the moving averages perform a bearish cross.
In case we choose the first scenario, we would exit the trade at the close of bar (2) at 1.3040, scoring a profit of almost 150 pips. If we decide instead to scale out half of our position at that point, we can swing the other part and move our stop-loss to breakeven, ensuring our trade will at least remain on the plus side with the previously earned 150 pips. Third, if we decide to ignore the stochastic entering the overbought zone, we can aim for a profit target double the amount risked at 1.3326 dollars, as marked by the green horizontal line. Afterward, we can either exit our entire position or scale it out and trail our stop, swinging the other portion until the EMAs make a bearish crossover.
There were several other entry signals. The first one was at bar 4 but we ignore it because the stochastic was already above 50. At bar 5 we can choose to go short, but we decide not to enter against the direction of the general trend (still, if we did, the trade would have been exited at bar 6 when the stochastic entered the oversold area, or at the bar 7 bullish EMA crossover).
Another possible long order could have been placed above the high of bar 8, but there was no follow-through buying and our stop would have been gunned. Bar 9 also generated a bullish signal.